
 Okily-dokily, here's more ice cream. This was a highly requested one, so I took a stab at it. I took several stabs at it...several creamy, delicious, salty, nutty, chocolaty stabs. Tough gig. Finally nailed it. I had to increase the amount of sugar in my standard base, since the blended pistachios counteracted some of the sweetness. Got 'er done though, and now you can too! Hit me in the comments with what flavor of ice cream you're dying to have veganized. Quick notes:
1/2 cup raw cashews, soaked at least 1 hour (overnight, if you don't have a high-powered blender), drained, and rinsed 1 cup raw, unsalted pistachio nutmeats, divided 1/2 cup water 14 ounce can coconut milk (regular, not the "lite" stuff) 3/4 cup plus 1 tablespoon granulated sugar 1 teaspoon vanilla 1 teaspoon arrowroot powder/flour Pinch salt 1/3 cup dark chocolate chips 3/4 teaspoon refined coconut oil 1/4 teaspoon coarse or flaky sea salt or, fancily, Fleur de Sel Into a (preferably) high-powered blender, add soaked cashews, 1/2 cup of the pistachios, water, coconut milk, sugar, vanilla, arrowroot, and salt. Blend until smooth, about 1 minute, scraping down the sides, if necessary, to mix in any stray cashew pieces that jumped up onto the side. Transfer to a medium saucepan, and heat over medium, stirring continually, until the arrowroot activates, and the mix thickens to an almost pudding-like consistency, 4 to 6 minutes. Once thickened, immediately transfer to a wide, high-sided vessel, and stir it around for 3 to 4 minutes to promote quick cooling. Once cooled (it can still be a little warm), transfer to a container and cover tightly. Refrigerate at least 4 hours. Add the chilled cashew/coconut mixture to your ice cream maker, and do whatever the maker's instructions say you have to do to make it into ice cream. In the meantime, place remaining pistachios in a small food processor, and pulse until roughly chopped. Add to the ice cream maker towards the end of the churning. If the nuts don't get evenly distributed, worry not, as you'll be stirring it all again later. To get those signature non-uniform, chocolate freckles and chips, you have to do some abstract art. Place chocolate chips and coconut oil into a small microwave safe bowl. Microwave 20 seconds. Almost nothing will happen, so stir it around and continue microwaving in 20 second bursts, stirring after every nuking, until it's totally melted. Stir in the coarse salt. Chose a container that's about 1 quart or so, and with the tines of a fork (or a child size spork), swoosh, swizzle, and splatter the inside surfaces of the container with chocolate. Next spoon enough ice cream on the bottom to make an even layer, then do more chocolate art on top of that layer. Add another ice cream layer, and then more chocolate squizzles. Continue until all the ice cream and chocolate is used up. Cover container, and place in the freezer for 1 hour. After an hour, the ice cream will be plenty cold but not totally frozen and still soft. Using a spoon, stir the ice cream. This will break up all those swoozles of chocolate, achieving that flecked look. Again, tightly cover and place in the freezer at least another 3 hours. It's fairly easy to scoop right out of the freezer, but letting it rest at room temperature for 5 minutes will make it a lot easier. Enjoy! 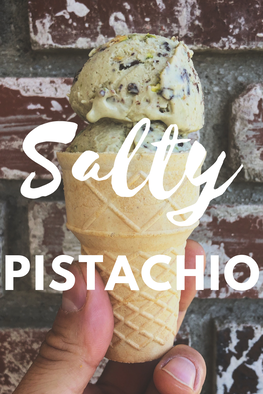
2 Comments
 So I made the mistake of asking my instagram audience what ice cream flavors they'd like to see me develop. And, well...I got some suggestions. The only reason I say it's a "mistake" is because I really liked all of the suggestions and I'm probably going to make (and eat) all of them. Parts of my body will love it, others won't. But I must press on with this important work, so here is one of the most requested flavors. I opted for using fresh mint, mostly because I actually had a bunch on hand and I don't have any extract on hand. But once I tasted this batch, I knew that an extract could not hold a candle to the perfectly smooth yet not-too-subtle mint flavor the fresh stuff imparted. So I'm not even going to present an option for extract here. Quick notes:
Mint Chocolate Chip Ice Cream Makes about 3 cups 1/2 cup raw cashews, soaked at least 1 hour (overnight, if you don't have a high-powered blender), drained, and rinsed 1/2 cup water 14 ounce can coconut milk (regular, not the "lite" stuff) 3/4 cup granulated sugar 1 teaspoon vanilla Pinch salt 1 bunch fresh mint (about 1 1/2 cups including the stems and everything) 1 teaspoon arrowroot powder/flour 1/3 cup dark chocolate chips 3/4 teaspoon refined coconut oil Into a (preferably) high-powered blender, add cashews, water, coconut milk, sugar, vanilla, and salt. Blend until smooth, about 1 minute, scraping down the sides, if necessary, to mix in any stray cashew pieces that jumped up onto the side. Transfer to a medium saucepan, and submerge the mint, stems and all, into the milk. Heat on medium, stirring occasionally, until it just begins to bubble. Let it simmer 2 minutes, then turn off the heat. Let mint steep in the milk for 1 hour. Once an hour has passed, remove the mint from the milk, making sure to return as much milk to the pot as is possible either by gently shaking or pressing into a fine mesh strainer over the pot. Surprise, the milk will not be green. Commercially made versions add food coloring, which I suppose you can do at this point if you like. I won't be mad at ya. Remove 2 tablespoons of the milk and place in a small bowl. Add the arrowroot, and whisk it into the 2 tablespoons of milk until dissolved. Place arrowroot mixture back into the main pot, and heat over medium, stirring continually, until the arrowroot activates, and the mix thickens to an almost pudding-like consistency, 4 to 6 minutes. Once thickened, immediately transfer to a wide, high-sided vessel, and stir it around for 3 to 4 minutes to promote quick cooling. Once cooled (it can still be a little warm), transfer to a container and cover tightly. Refrigerate at least 4 hours. Add the chilled cashew/coconut mixture to your ice cream maker, and do whatever the maker's instructions say you have to do to make it into ice cream. To get those signature non-uniform, chocolate freckles and chips, you have to do some abstract art. Place chocolate chips and coconut oil into a small microwave safe bowl. Microwave 20 seconds. Almost nothing will happen, so stir it around and continue microwaving in 20 second bursts, stirring after every nuking, until it's totally melted. Chose a container that's about 1 quart or so, and with the tines of a fork (or a child size spork), swoosh, swizzle, and splatter the inside surfaces of the container with chocolate. Next spoon enough ice cream on the bottom to make an even layer, then do more chocolate art on top of that layer. Add another ice cream layer, and then more chocolate squizzles. Continue until all the ice cream and chocolate is used up. Cover container, and place in the freezer for 1 hour. After an hour, the ice cream will be plenty cold but not totally frozen and still soft. Using a spoon, stir the ice cream. This will break up all those swoozles of chocolate, achieving that signature flecked look. Again, tightly cover and place in the freezer at least another 3 hours. It's fairly easy to scoop right out of the freezer, but letting it rest at room temperature for 5 minutes will make it a lot easier. Enjoy! 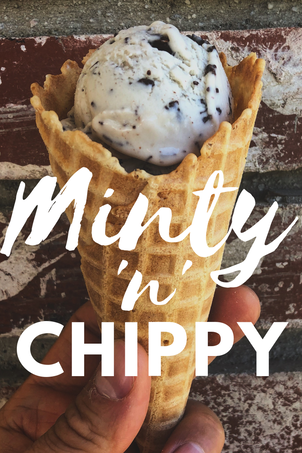 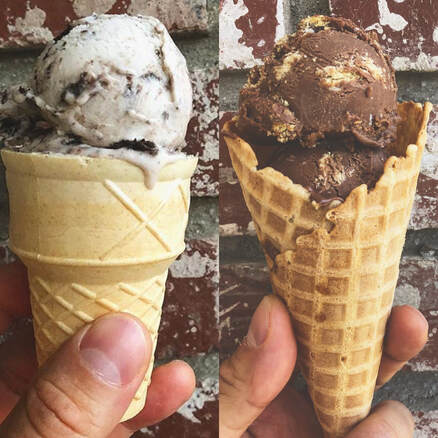 Droppin' a little double fantasy on ya, here. I wrote my original cookies 'n' cream recipe last year, and never got around to posting it. Then, the other day, I decided it was time to bust out the ice cream maker, so I did what I call an "inverse cookies 'n' cream" since it's a chocolate ice cream with vanilla Oreo-type cookies. Down at the bottom is a little collection of Instagram stories I made when I was making one of the recipes. Sorry but the live video I mention in the video is not available, but at least you can see some of the process. So here are both of the recipes. Enjoy! Quick notes:
Classic Cookies 'n' Cream Makes about 3 cups 1/2 cup raw cashews, soaked at least 1 hour (overnight, if you don't have a high-powered blender), drained, and rinsed 1/2 cup water 14 ounce can coconut milk (regular, not the "lite" stuff) 1 teaspoon vanilla 1 teaspoon arrowroot powder/flour 3/4 cup granulated sugar Pinch salt 1 1/2 cups roughly crushed up Oreo cookies Into a (preferably) high-powered blender, add cashews, water, coconut milk, sugar, vanilla, arrowroot, and salt. Blend until smooth, about 1 minute, scraping down the sides, if necessary, to mix in any stray cashew pieces that jumped up onto the side. Transfer to a medium saucepan and heat on medium, stirring continually, until it just begins to bubble, at which point the arrowroot will activate and the mix will thicken to an almost pudding like consistency, 4 to 6 minutes. Once thickened, immediately transfer to a wide, high-sided vessel, and stir it around for 3 to 4 minutes to promote quick cooling. Once cooled (it can still be a little warm), transfer to a container and cover tightly. Refrigerate at least 4 hours. Add the chilled cashew/coconut mixture to your ice cream maker, and do whatever the maker's instructions say you have to do to make it into ice cream. Once that is done, in a large bowl make an ice bath with ice and water. Place a smaller bowl inside the ice bath. Remove the ice cream from the machine, place it in the smaller bowl. This is simply to keep the ice cream from melting too much while you're transferring the ice cream from the machine. Depending on style of machine it could take a couple minutes to scrape ice cream off the sides and such. Remove the bowl from the ice bath as it will be too wobbly to stir the cookies in while it's floating in the ice bath. Add the crushed up cookies and fold them in with a spatula as quickly as possible. The ice cream will melt fast! Once the cookies are mixed in, add the ice cream to a container, tightly cover and place in the freezer at least 4 hours. It's fairly easy to scoop right out of the freezer, but letting it rest at room temperature for 5 minutes will make it a lot easier. Enjoy! Inverse Cookies 'n' Cream Makes about 3 cups 1/2 cup raw cashews, soaked at least 1 hour (overnight, if you don't have a high-powered blender), drained, and rinsed 1/2 cup water 14 ounce can coconut milk (regular, not the "lite" stuff) 3/4 cup, plus 1 tablespoon granulated sugar 1/2 cup dutch process coco powder 1 teaspoon vanilla extract 1 teaspoon arrowroot powder pinch salt 1 1/2 cups roughly crushed up vanilla Oreo-style cookies (like vanilla Joe-Joe's from Trader Joe's) Into a (preferably) high-powered blender, add cashews, water, coconut milk, sugar, coco powder, vanilla, arrowroot, and salt. Blend until smooth, about 1 minute, scraping down the sides, if necessary, to mix in any stray cashew pieces or coco powder that jumped up onto the side. Transfer to a medium saucepan and heat on medium, stirring continually, until it just begins to bubble, at which point the arrowroot will activate and the mix will thicken to an almost pudding like consistency, 4 to 6 minutes. Once thickened, immediately transfer to a wide, high-sided vessel, and stir it around for 3 to 4 minutes to promote quick cooling. Once cooled (it can still be a little warm), transfer to a container and cover tightly. Refrigerate at least 4 hours. Add the chilled cashew/coconut mixture to your ice cream maker, and do whatever the maker's instructions say you have to do to make it into ice cream. Once that is done, in a large bowl make an ice bath with ice and water. Place a smaller bowl inside the ice bath. Remove the ice cream from the machine, place it in the smaller bowl. This is simply to keep the ice cream from melting too much while you're transferring the ice cream from the machine. Depending on style of machine it could take a couple minutes to scrape ice cream off the sides and such. Remove the bowl from the ice bath as it will be too wobbly to stir the cookies in while it's floating in the ice bath. Add the crushed up cookies and fold them in with a spatula as quickly as possible. The ice cream will melt fast! Once the cookies are mixed in, add the ice cream to a container, tightly cover and place in the freezer at least 4 hours. It's fairly easy to scoop right out of the freezer, but letting it rest at room temperature for 5 minutes will make it a lot easier. Enjoy!  Serves 2 to 4 (enough to make 2 good sized BLT sandwiches, or 4 side servings for breakfast plates.) 6 ounces king oyster mushrooms, tops trimmed, stems thinly sliced lengthwise (1/16 to 1/8 inch thick) 2 tablespoons soy sauce 2 teaspoons ketchup 1 1/2 teaspoons maple syrup 1 teaspoon apple cider vinegar 1 teaspoon liquid smoke 1 teaspoon oil, plus more for frying Place mushrooms slices in a zip top bag. To a small measuring cup or bowl, add soy sauce, ketchup, maple syrup, apple cider vinegar, liquid smoke, and oil. Whisk to combine, then pour into bag. Massage marinade around a bit. The mushrooms won't be submerged by the marinade, but over time, water will be drawn out of the mushrooms, adding to the body of the marinade, eventually submerging the mushrooms in tasty liquid. Push as much air as is possible out of the bag, and store in the fridge at least 8 hours or overnight. When ready to eat heat a wide non-stick skillet to medium, and add 1 tablespoon of oil. Remove mushrooms from marinade, shaking off the excess. Place "bacon" in the pan, in batches if necessary, making sure they sizzle. Fry 1 to 2 minutes, then toss and cook 3 to 4 more minutes, tossing occasionally, until browned with some blackened crispy edges. Drain briefly on a paper towel lined plate, serve. 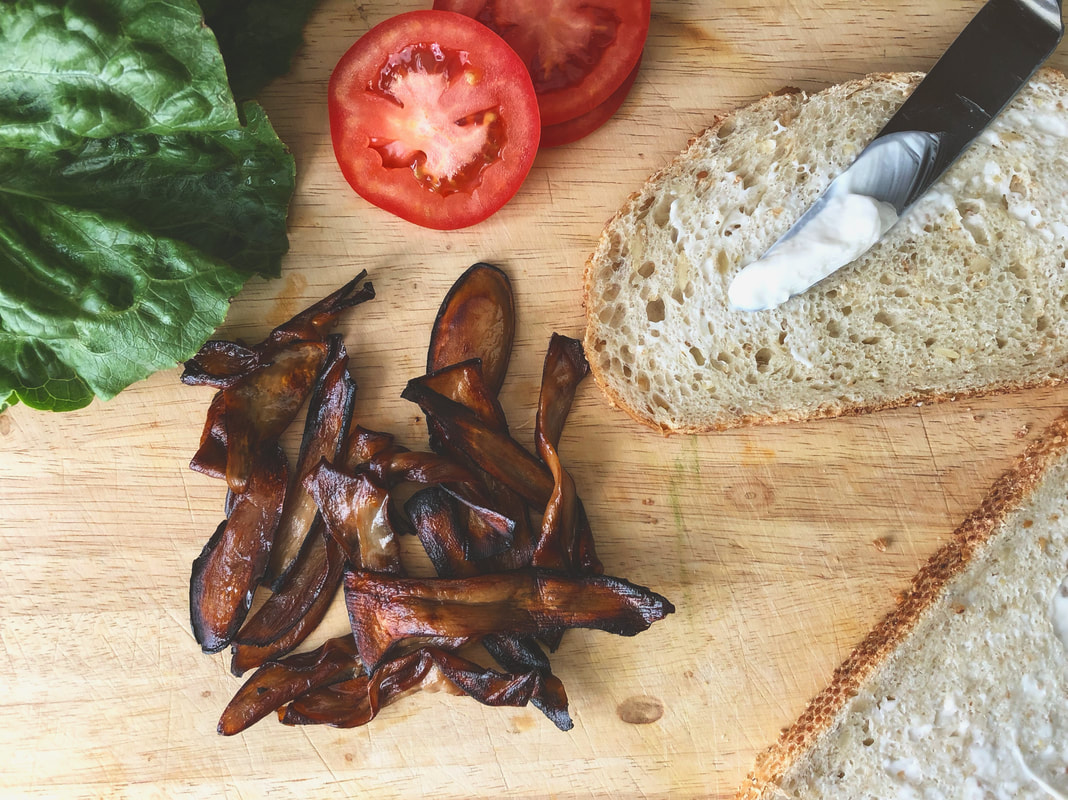 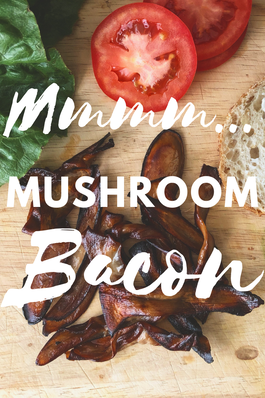 Sorry no video for this one. It's pretty straightforward. I made this soup the other night, and it was pretty darn good and easy, so I thought it was worth writing up for you. When I made this soup, my 5-year-old was super mad that dinner wasn't hot dogs or spaghetti, so he engaged in like a 20 minute meltdown over the fact that I told him this was the only available food. I think we may have (definitely) set a bad precedent until now, having backup meals at the ready if he didn't eat the regular food I was making. I decided to end that practice, so when I told him this was the only dinner, he did not take kindly to it. However, after putting himself through massive emotional strain OVER GODDAMN SOUP (a soup that happens to be all kinds of delicious, mind you), he reluctantly sat down, and leaned over the bowl of the, now lukewarm, soup. And through his tears, and sobs, and dramatic whimpering, he meekly said, "It smells kind of good." Then he ate the whole fucking bowl, and begged for more. Kids, whattayagonnado? Serves 4 to 6 1 medium yellow onion roughly chopped 8 cups broccoli florets, plus an additional 10 florets for garnish 2 small Yukon gold potatoes, peeled, cubed 4 cloves garlic smashed 6 cups chicken-style stock 1 1/2 cups whole raw cashews 3/4 cup plain unsweetened almond milk 1 to 2 tablespoons prepared basil pesto 1 tablespoon high heat oil Extra virgin olive oil for garnish Salt and pepper to taste Heat a pot or Dutch oven to medium. Add onion. When the edges of the onion get browned and begin to stick to the bottom, deglaze with a touch of water. Continue cooking and stirring 8 to 10 minutes, adding a touch of water when necessary to prevent sticking. Onions should be lightly golden and tender, but not fully dark and soft like a caramelized onion - somewhere in between raw and caramelized. Add the broccoli, potatoes, garlic, stock, cashews, and milk. Bring to a simmer (not a hard boil because that makes the broccoli stinky), and cook 10 to 12 minutes until broccoli and potatoes are tender. Stir in the pesto, and transfer everything to a blender (in batches if necessary) and blend until smooth. Alternatively, use an immersion blender, and blend it right there in the pot. Return to pot, season with salt and pepper to taste, and keep warm. For the seared broccoli garnish: Cut broccoli florets in half so there is one flat side. Season generously with salt and coarsely cracked pepper. In a skillet, add oil and heat on high. Place broccoli, flat side down in the pan so they sizzle. Sear 1 to 2 minutes until browned. Turn them over, and add a tablespoon of water to the pan, then quickly cover. Let steam for one additional minute. Ladle soup into bowls and top with broccoli, then artfully drizzle a bit of extra virgin olive oil over top. Done. 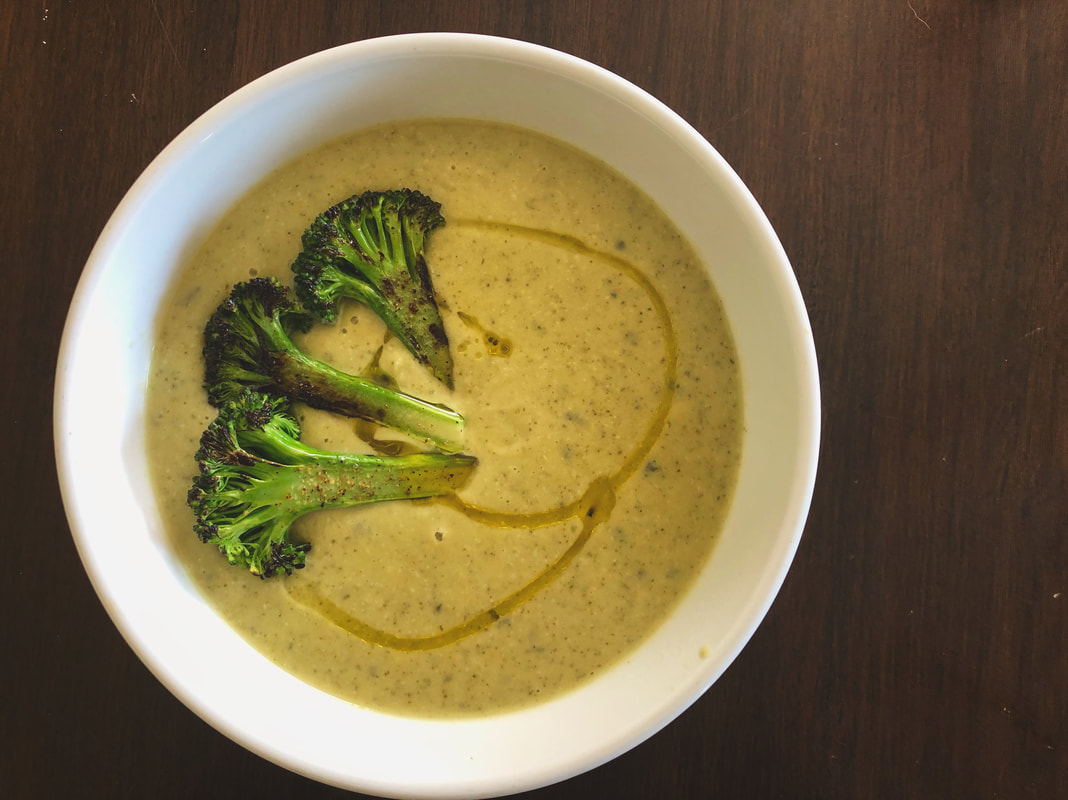 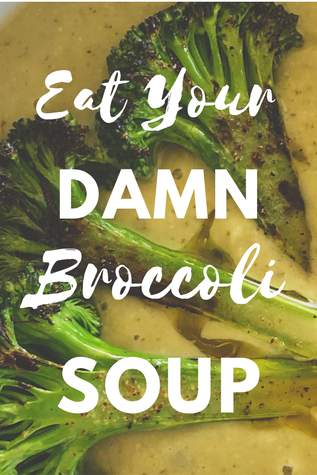 Sometimes you just wanna throw some butter on your spaghetti and call it a day. Other times you'll drop 10 bucks on a jar of good-ass pasta sauce, and kill the whole thing with a loaf of bread. Hey, I've done both, and I ain't mad at it. If you want to save some cashola, though, fugghetabout that fancy expensive sauce, and just make this one. It's good as hell! Enough for 8 Servings. 1/4 cup extra virgin olive oil 10 cloves garlic, sliced 28 ounce can whole, peeled tomatoes, crushed by hand 1 teaspoon soy sauce 1 teaspoon dried Italian seasoning herb blend 1 teaspoon fine sea salt 1/4 teaspoon sugar 1/8 teaspoon pepper 15 leaves fresh basil In a wide skillet or medium saucepan, add olive oil and garlic. Turn heat to medium low. Once garlic begins to sizzle a bit, reduce heat to low. Cook, stirring occasionally 10 to 12 minutes, until the garlic is golden with slightly toasted edges. Add tomatoes, and stir in soy sauce, Italian seasoning, salt, sugar, and pepper. Add about 1/4 cup of water to the tomato can and swish it around to release any tomato puree remaining inside, and add that to the pan. Increase heat to medium and bring to a low simmer (reducing heat again to medium low, if necessary, to find the right heat level for some low bubbling action), stirring occasionally, at least 20 minutes, and up to 1 hour. In the last 5 minutes of cooking, hand-tear the basil, and stir it into the sauce. Once the basil is wilted, the sauce is ready to serve. To store, let cool completely and keep in a covered container for a week, or freeze for a month. 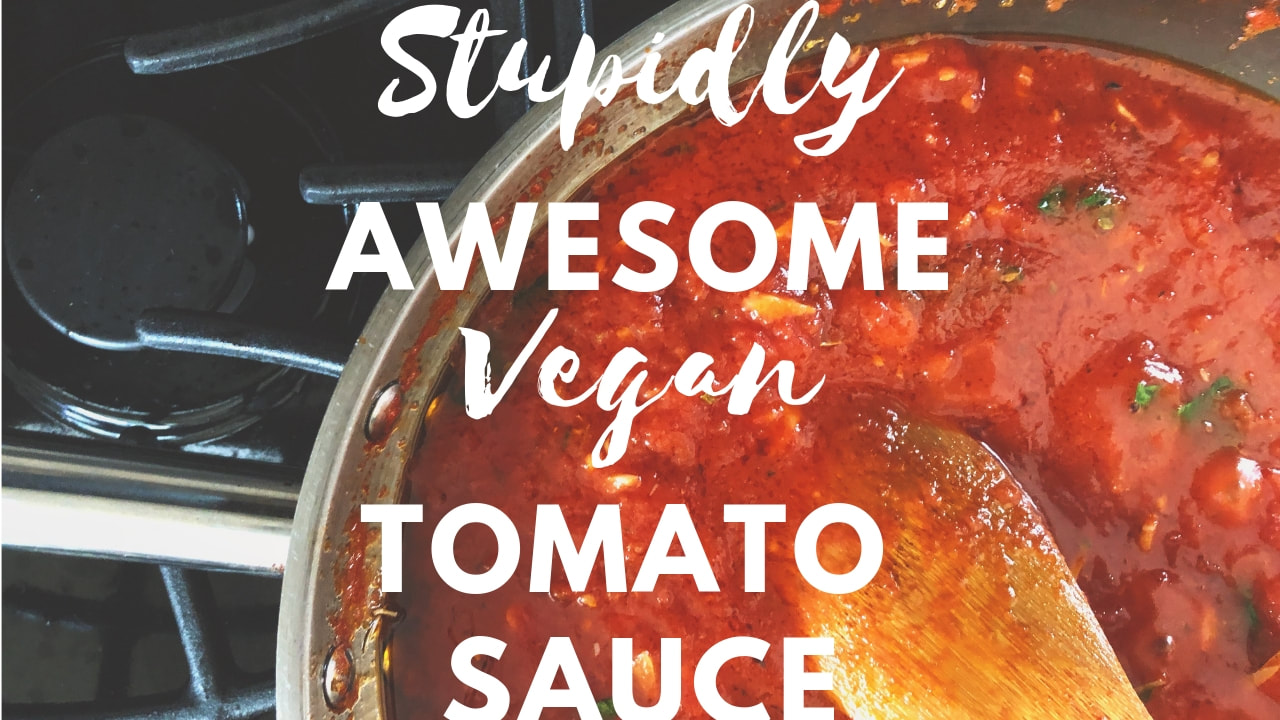 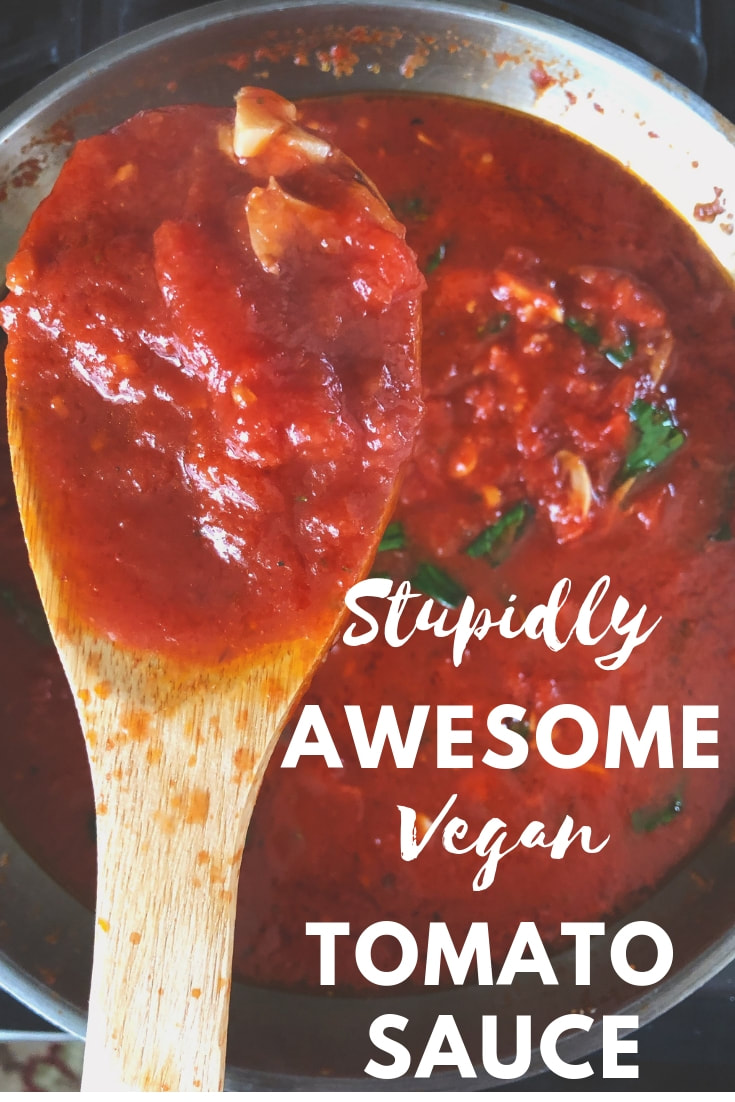 For the uninitiated, a pizzelle is an Italian waffle cookie, most commonly flavored with anise, orange, lemon, or coco. I grew up eating them at every family event and holiday. I got very excited when the Follow Your Heart Vegan Egg became available, because I had been having trouble getting the right texture, using the egg replacers on the market. So, a couple years ago, I was able to use the vegan egg to perfect my vegan pizzelle recipe. I made a video with the great Vince Lia on his youtube channel. So here is the video and full recipe. Chef's Notes:
Makes 12-14 cookies 1 prepared Follow Your Heart Vegan Egg ⅓ cup granulated sugar ¼ cup melted vegan butter ¼ teaspoon anise oil or extract ¾ cup + 2 tablespoons all purpose flour ¼ teaspoon vanilla ¼ teaspoon baking powder pinch salt powdered sugar for dusting Heat your pizzelle maker according to directions. In a medium mixing bowl add the egg and sugar, and whisk vigorously for about 1 minute, until the sugar is incorporated. It doesn't have to be fully dissolved. Whisk in the melted butter, vanilla, and anise. In a medium mixing bowl, sift together the flour, baking powder, and salt. Fold the flour mixture into the egg mixture until combined into a smooth dough. To make larger pizzelles, use a rounded tablespoon of the dough, and to make the smaller ones, use a leveled off tablespoon. Place the desired amount of the dough in the center of each round iron on your pizzelle maker, then close and lock it. Cook for 25-30 seconds, until there is slight browning all around. Remove and let cool on a wire rack. Dust with powdered sugar when cool.  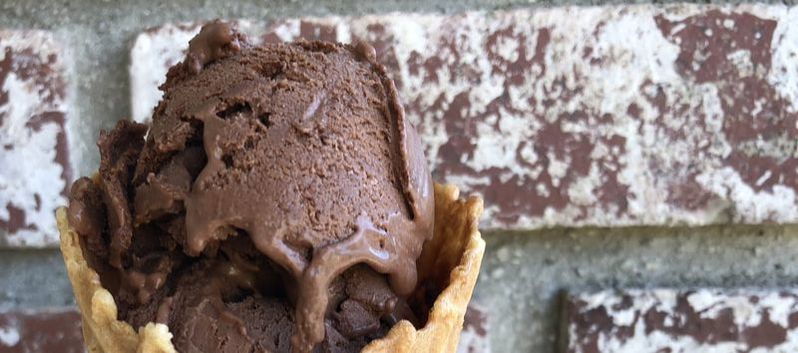 Okey dokey! Instagram has spoken and my audience has chosen for me to post my newest (and probably best) ice cream flavor. Smart choice, people! I've been playing with ice cream recipes all summer, and have worked up a damn good base, to which any assortments of flavors or mix-ins can be added. The original vanilla base, I'll post when I write up my Cookies n' Cream recipe (that got less votes on my instagram poll) some other day. The base is pretty much the same as this one, except that I had to bump up the sugar to balance out the bitter/salty chocolate, to achieve a perfectly rich and decadent ice cream, with varying texture and a nice salty hit. Quick notes:
Makes about 3 cups 1/2 cup raw cashews, soaked at least 1 hour (overnight, if you don't have a high-powered blender), drained, and rinsed 1/2 cup water 14 ounce can coconut milk (regular, not the "lite" stuff) 3/4 cup, plus 1 tablespoon granulated sugar 1/2 cup dutch process coco powder 1 teaspoon vanilla extract 1 teaspoon arrowroot powder pinch salt 1 batch Simple Salted Truffles (recipe below) Into a (preferably) high-powered blender, add cashews, water, coconut milk, sugar, coco powder, vanilla, arrowroot, and salt. Blend until smooth, about 1 minute, scraping down the sides to incorporate any coco powder stuck to the jar. Transfer to a medium saucepan and heat on medium, stirring continually, until it just begins to bubble, at which point the arrowroot will activate and the mix will thicken to an almost pudding like consistency, 4 to 6 minutes. Once thickened, immediately transfer to a wide, high-sided vessel, and stir it around for 3 to 4 minutes to promote quick cooling. Once cooled (it can still be a little warm), transfer to a container and cover tightly. Refrigerate at least 4 hours. In the meantime prepare the ganache. It's hella easy! It's down below. Add the chilled cashew/coconut mixture to your ice cream maker, and do whatever the maker's instructions say you have to do to make it into ice cream. Once that is done, add some of the truffles and churn it to incorporate. Then add a few more, and repeat until all of them are in. If your style of mixer doesn't do a good job of incorporating the truffles, remove the ice cream from the machine, place it in a mixing bowl, and fold them in with a spatula as quickly as possible. The ice cream will melt fast! Don't expect the truffles to be uniformly incorporated anyway. There will be darker streaks, clumps, swirls, balls and such throughout the final product. Once the truffles are mixed in, add the ice cream to a container, tightly cover and place in the freezer at least 4 hours. It's fairly easy to scoop right out of the freezer, but letting it rest at room temperature for 5 minutes will make it a lot easier. Enjoy! Simple Salted Truffles 2 ounces dark chocolate bar, roughly chopped. 1/4 cup unsweetened almond milk 1/2 teaspoon flaked or coarse sea salt 1 teaspoon extra virgin olive oil In a microwave safe bowl place the chocolate and milk. Heat on high 45 seconds, then let stand in the microwave 2 minutes. Whisk together until smooth. If it's not hot enough to completely melt the chocolate, heat it again for 10 seconds and whisk again until melted. Repeat if necessary. Once melted and mixed, pass the ganache through a fine mesh strainer. This will ensure a consistent, silky smooth texture throughout. Stir in salt and olive oil. Allow to cool down at room temperature for 20 minutes, then cover and refrigerate at least 1 hour. Use a 1/2 teaspoon measuring spoon to make little portions, then quickly roll them into balls between your palms, and place on a plate. Chill in the freezer, at least 30 minutes, or until the ice cream is ready.  This was a quick and simple dinner I threw together the other night. I posted a pic on the insta, and I got a bunch of DMs and comments that were all like, "hey, where's this recipe?" And I was all like, "check back later." Well, later has arrived, and the recipe here now. I put it right here. Enjoy! Chef's Note: Risotto should not be stiff or dry. It should be slightly jiggly in the bowl with a little fluidity to it. If it’s too stiff stir in a touch more broth (you can user water if you're out of broth). When you pass a spoon through the risotto, the channel you’ve created with the spoon should fill itself back in. That's the consistency you're looking for. Serves 6-8 3 cups arborio rice 2 cups frozen green peas, thawed 10 cups vegstock, warmed 1/2 medium onion, diced 4 cloves garlic, sliced 2 tablespoons butter divided 12 ounces mushrooms of choice, roughly chopped or sliced Zest of 1 lemon Juice of 1/2 lemon 2 tablespoons vegan parm (optional) Salt Pepper In a large pot or Dutch oven, add 1 tablespoon butter and heat to medium. Add onions and a pinch of salt. Cook, stirring occasionally 3 to 4 minutes until translucent and tender. Add garlic and cook 2 additional minutes. Add rice, and stir to coat with the butter, onion, and garlic. Toast the rice, stirring constantly 2 to 3 minutes until the edges of the grains become translucent. Reduce heat to medium low. Ladle in enough stock to cover the rice, then stir continually until most of the stock is absorbed. Before the bottom of the pot gets totally dry, ladle in additional stock to cover the rice, and continue stirring. Do several rounds of ladling and stirring, until most of the stock has been used and the rice is creamy with a bit of an al dente bite. It shouldn’t be mush. You can take short breaks from stirring to prepare the remaining ingredients as instructed in the following section. In a wide skillet, add 1 tablespoon butter and heat to medium high. Add mushrooms and sauté, 4 to 5 minutes until browned and tender. Season with salt and pepper, set aside and keep warm. In a small food processor add the peas, lemon juice, and a healthy pinch of salt. Purée, adding a touch of water or stock if needed to achieve a mostly smooth consistency. Once the risotto is creamy with an al dente bite, stir in the pea purée and Parmesan. Season with salt and pepper to taste. Serve the risotto topped with the mushrooms, a pinch of lemon zest, and a bit of additional Parmesan. 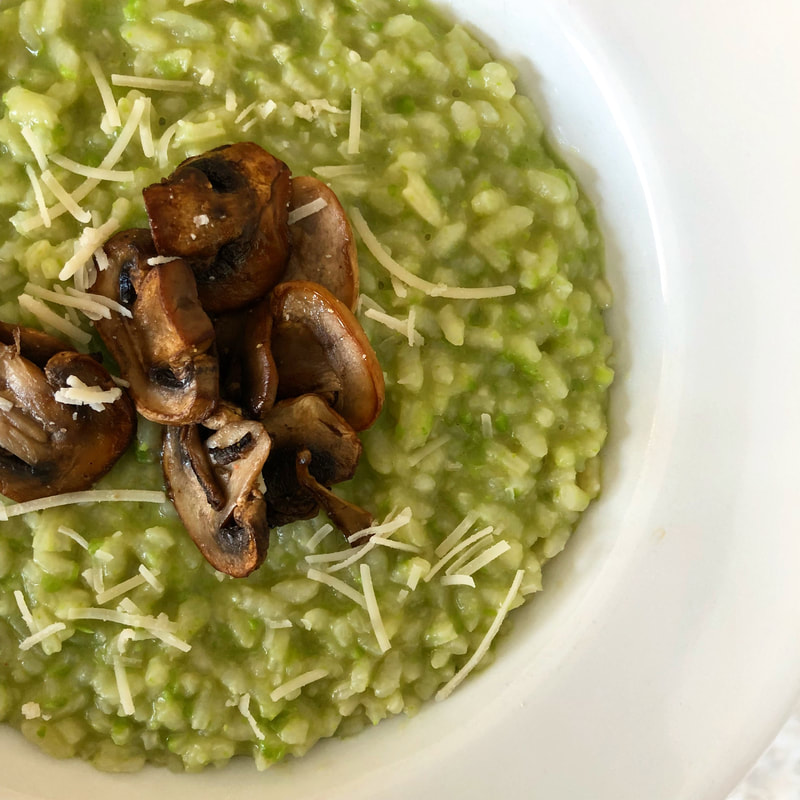 I have a regular-ish facebook live show. Today I cooked some hella tasty burritos from this book: 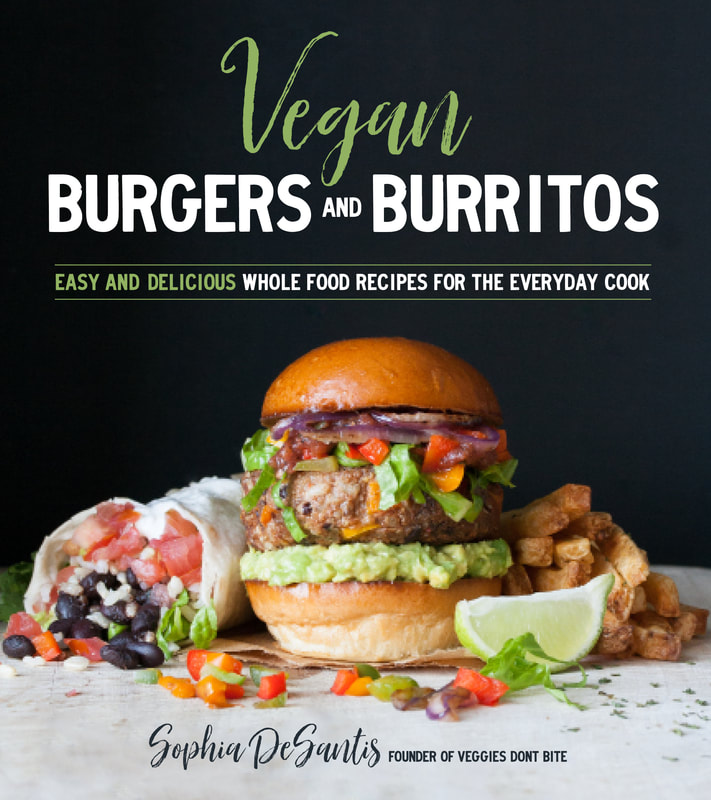 CLICK THE PIC TO GET THE BOOK! HERE'S THE RECIPE Chipotle and lime were meant to be soul mates. The flavor combo is insanely amazing. This easy-to-throw-together burrito is meant to be eaten in silence. The flavor gods need to be thanked for this one. Yield: 4 TO 5 BURRITOS Level: 1 1 cup (170 g) chopped red, yellow and green bell pepper mix ½ cup (85 g) chopped spicy pepper of choice (jalapeño, cherry bomb, etc.) ½ cup (76 g) chopped red onion Low-sodium veggie broth (about ½ cup [118 ml]) or drizzle of oil, for sautéing 1 tsp sea salt 1 tsp garlic powder 2 tbsp (30 ml) fresh lime juice RICE AND BEANS 1 ½ cups (241 g) cooked brown rice 1 cup (200 g) cooked or canned black beans, drained and rinsed ¼ cup (10 g) chopped fresh cilantro 1 tbsp (15 ml) fresh lime juice ¾ tsp sea salt ½ tsp chipotle powder TO SERVE 4 to 5 tortillas Avocado Shredded cabbage Smoky Tangy Cream (page 135) or World’s Best Roasted Salsa (page 132) Sauté the peppers and onion in a pan over medium heat with veggie broth, salt, garlic powder and lime juice until cooked and fragrant, about 10 to 12 minutes. You may need to add more broth if it gets too dry. The mixture is ready when the veggies are soft and almost sticky looking. To make the rice and beans, put the cooked rice, beans, cilantro, lime juice, salt and chipotle powder in a bowl and mix well. Once everything is ready, build the burritos by filling the tortillas with the rice and beans, sautéed veggies, avocado and shredded cabbage. Drizzle the sauce or salsa over the filling ingredients. To fold the burrito, fold the sides over toward the center, then roll upward to create a burrito. (See page 15 for step-by-step photos.) You can grill the seam for 7 to 8 minutes until it seals and closes the burrito. You can also grill the other side to make it crisp. Kids: This can be served as a bowl if folding a burrito is too hard! Do not add spicy peppers or chipotle powder. Substitute spicy peppers with bell peppers. Here's what it looks like when someone other than me makes the burrito and takes the picture: 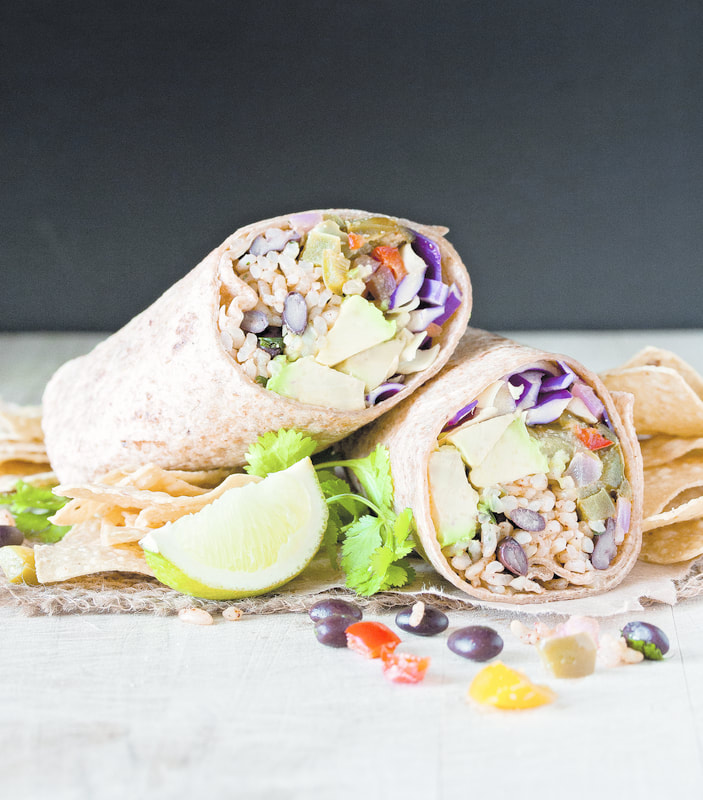 |

CREATORVegan chef, cookbook author, and multi-media personality, Brian L. Patton. Just making good, old-fashioned food. You like food, right? Archives
January 2023
Categories |
 RSS Feed